Upcoming Webinar : Leveraging Web Data For Advanced Analytics

On 6th Dec, 11.00 AM to 12.00 PM ( EST) 4.00 PM to 5.00 PM ( GMT )

TechMobius

Methods And Steps To Deploy Microsoft Azure Function App On Azure

How to create a function app and get it running locally?

Let’s start with creating a sample function app which does OCR of an image and returns the content. Before we start, install Azure functions core tools and Azure CLI.

Step 1:

Run the following command to create a local function app project called OcrTestFunctionProj.The –docker option will generate a Dockerfile that we can edit to install custom libraries and dependencies in the Azure functions app where the container will be deployed.

func init OcrTestFunctionProj –worker-runtime python –docker

Step 2:

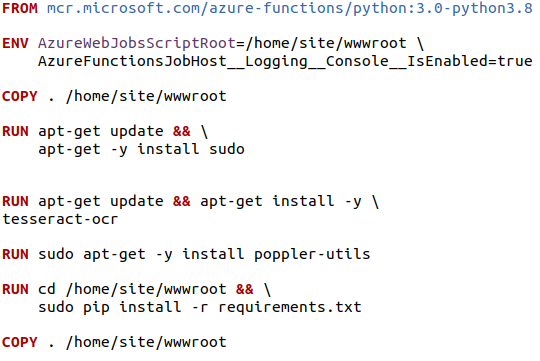
Navigate into the OcrTestFunctionProj folder and edit the Dockerfile to look like this:

Step 3:

Add a function to the project using the following command. The –name option specifies a unique name for the function and –template specifies the trigger. In out case we want our function to run in response to an HTTP Trigger.

func new –name HttpOcrFunc –template ‘HTTP trigger’

Step 4:

Add a requirements.txt file inside the project file and add pytesseract and pillow so these are automatically installed once we take it for deployment.

Step 5:

Test the new function by running the following command the project root folder.

func start

Navigate to the HttpOcrfunc endpoint URL in the terminal output and if there is a response with “This HTTP trigger function executed successfully…”, then we are all set go.

Step 6:

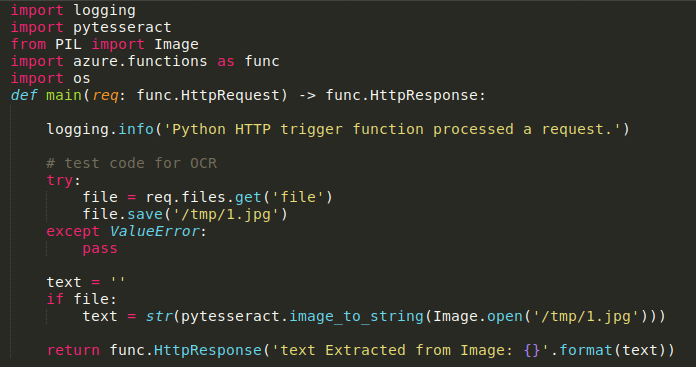
Edit the OcrTestFunctionProj/HttpOcrFunc/__init__.py file and add the following code.

Step 7:

Save this file and run the func start command again, we can see the ocr output on the screen. This is how a function app is created and is running locally.

Next we will have to get it running on the cloud.

How to deploy your created function app on azure portal?

Check the following before you move forward:

  • Do you have an azure portal account, if not create one.
  • Do you have a Docker hub account, if not create one.

Docker hub Account creation

Docker hub ( https://hub.docker.com/ )account creation is pretty straight forward like any other website, sign up with a username, email ID and Password. After creation remember the docker ID (username) to access the files inside the hub.

Once your Azure portal account is ready, let’s begin with creating a new Azure Function App.

Step 1:

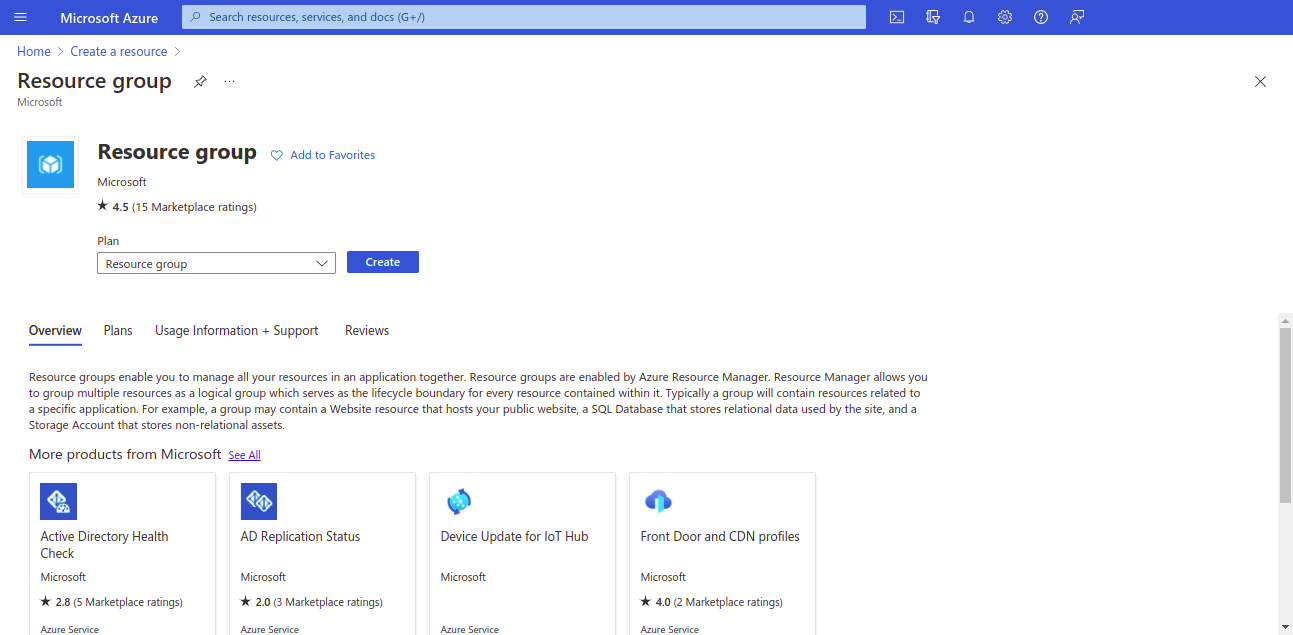
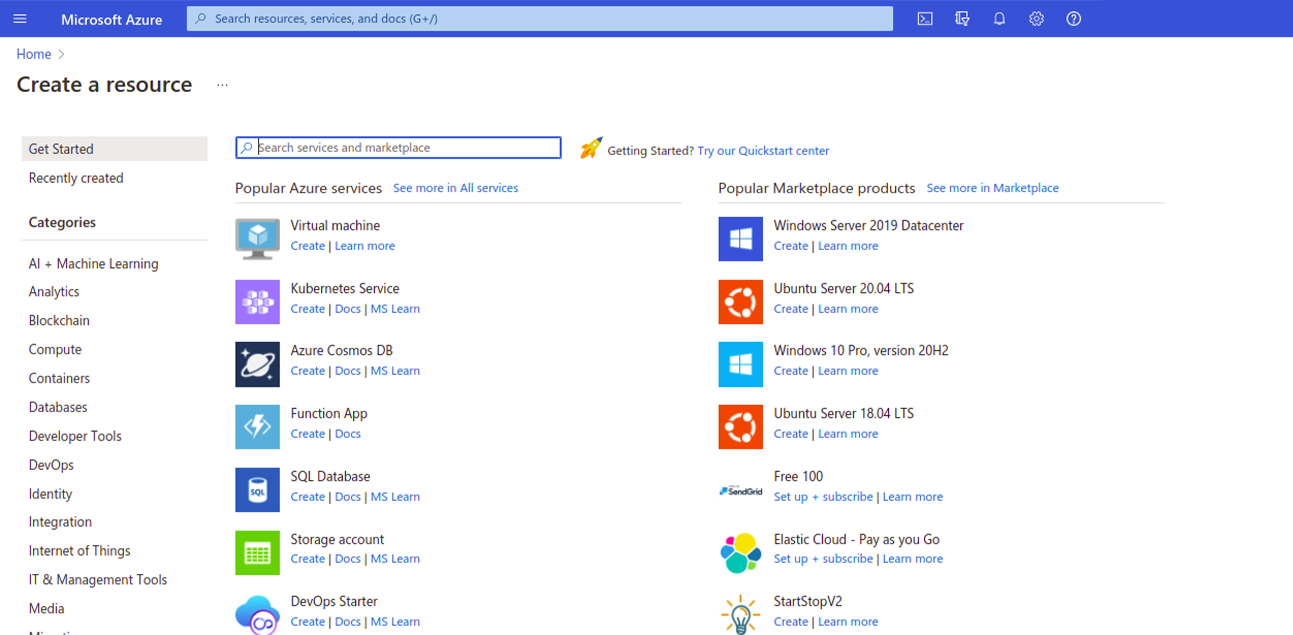
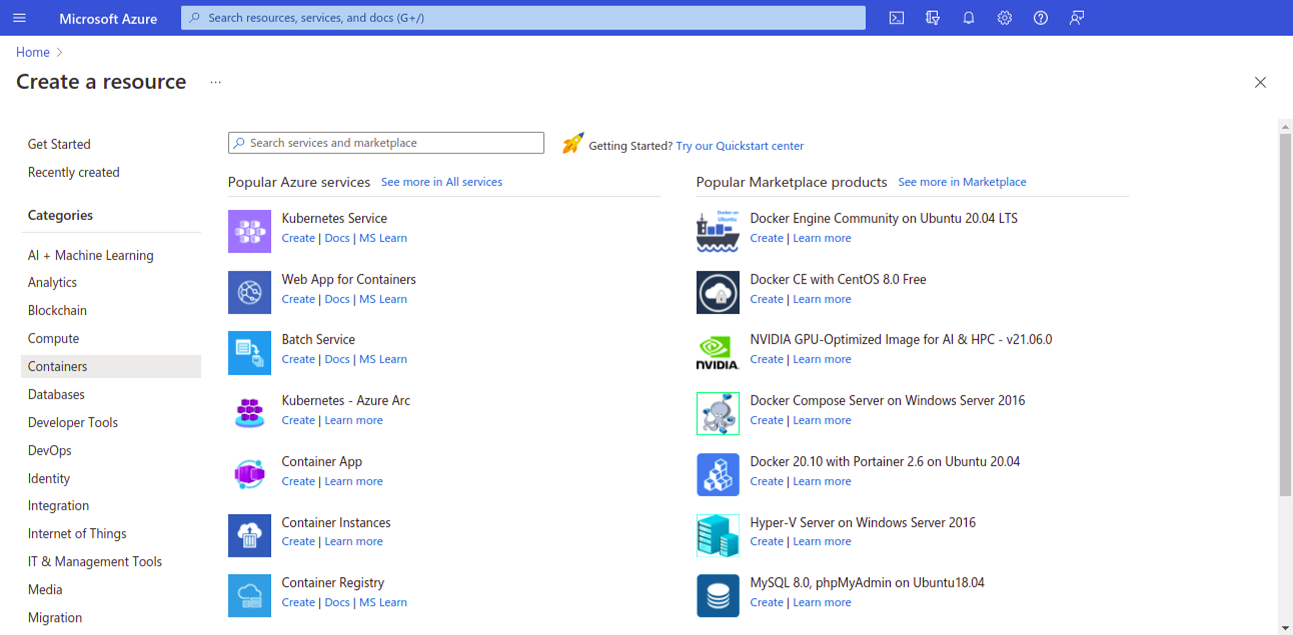
Go to Azure portal : https://portal.azure.com/ and create a new Resource Group by clicking on create a resource and searching for Resource group. Give it unique name, select your preferred location and click Review + create. A Resource group is a container of all the related resources that will be of need in completing this function app deployment process or any specific Azure cloud solution. In our case we will an Azure Functions app , Storage account and an Azure Container Registry in our resource group.

Step 2:

On the portal home, click Create a resource and search for and select Function App. In the Basics tab, select your Subscription, the resource group you just created, a unique Function App name and then for publish field select Docker Container and finally region. Select Next:Hosting. In the hosting tab , for storage, select a new storage account, then select a plan and select Review + Create. 


Your Azure Functions app is now ready.

With the function app and docker hub account created and before going into pushing the docker images on to azure, let’s explore a little around the containers in the storage account we just created. 

The storage account has something called the containers which acts a storage system similar to the file storage system locally and called as Blob storage. We can create any number of containers ( folders in the local system are referred to like this on azure) with any number of files in it. The files inside the containers are called as blobs. The function app files can be written in such a way that it fetches the data from the Blob storage to manipulate on the same. It takes all the advantages of storing the required data on cloud.

With all this prior information let’s actually get started and see how the function app that is running locally runs exactly the same way on cloud

Method 1:

Convert your function app folder into docker image and configure the same on the Azure functions app.

Step 1:

Open the terminal and change the path to your working directory.

Step 2:

Open the docker file that was generated and edit it.


Step 3:

Build and Push the Docker container
  1. Build the docker image for the container described by our Dockerfile. Replace the <YOUR_DOCKER_HUB_ID> with your own Docker ID and <FUNCTION_APP_NAME> with your function app name:
docker build –tag <YOUR_DOCKER_HUBB_ID>/<FUNCTION_APP_NAME>:v1.0.0 . 2. Test by running the following command: docker run -p 8080:80 -it <YOUR_DOCKER_HUBB_ID>/<FUNCTION_APP_NAME>:v1.0. Navigate to http://localhost:8080 and you should see a placeholder image that says: Your functions 3.0 app is up and running. 3. Now push this docker image to docker hub and pushing: docker login docker push <YOUR_DOCKER_HUBB_ID>/<FUNCTION_APP_NAME>:v1.0.0 .

Step 4:

Lets push this docker images present on the docker hub to the function app.

On the Function App page, go to Container setting on the sidebar, select Docker Hub in image source and enter <YOUR_DOCKER_HUBB_ID>/<FUNCTION_APP_NAME>:v1.0.0 in the full Image name and Tag field and then click save.

Step 5:

Now your function app is successfully deployed in the azure cloud.

Step 6:

To Test if its running, start the function app ,go to Functions on the sidebar, select the http trigger file, and click on Get Function URL.


Step 7:

Either paste the URL in the browser and check if you get the same output as in the local machine or post the url on postman to see if you get a 200 OK.

Step 8:

If yes, then our function app is successfully up and running in the cloud.

Method 2 :

Push the docker images to Azure Container Registry(ACR)

Step 1:

Create a container registry. Go to Azure portal. Click on Create a resource, click on Container registry, provide the details you provided during the creation of the function app (same resource group and subscription).


Step 2:

Push the Docker images to the ACR using the following commands.

  1. docker login <portalloginserver>

username and password in portal

2. docker images

You will get the images that we created with the image ID

3. docker tag <IMAGEID> <loginserver>/<customname>

4. docker images

You will find the docker image with the custom name you just created it with.

5. docker push <reponame>

Step 3:

With this we have pushed the docker images into our acr. The images will be present in the repository field on the side bar in ACR.

Step 4:

Now we should configure the acr image details on the function app, only then you can end up with step 5 in method 1.

Step 5:

 ACR configuration on the Function app

Open the function app and on the Deployment tab in the side bar, click deployment centre. In the registry settings,

  • Choose single container as the container type.
  • Choose Azure container registry as the registru source.

Note: Once this is chosen, the rest of the fields gets auto filled, if not, fill it manually with the correct names taking the reference from the repositories present the ACR where you can find the registry , Image and the tags as well. Make sure the authentication has admin credentials.

Once you give save on top , we can find the function app deployed and check the files in the Functions tab in the side bar in the Function app.

Step 6:

To Test if its running, start the function app ,go to Functions on the sidebar, select the http trigger file, and click on Get Function URL.

Step 7:

Either paste the URL in the browser and check if you get the same output as in the local machine or Post the url on postman to see if you get a 200 OK.

Step 8:

 If yes, then our function app is successfully up and running in the cloud.

Method 3 :

Automating the acr using task when there’s a push to the Azure Devops Repository.

Step 1:

Make sure you have an Azure Devops account with a repository to Push the function app.

Step 2:

Creation of the acr task.<br/>

Assuming, the container registry is already created (if not check step 1 of method 2), let’s begin with the creation of tasks. There is something called the task in azure, which is the building block for defining automation in a pipeline. Creation of acr task will automate the manual push and configure process we did in the previous method.

The general mechanism behind this is that, once there is push to the repository, the acr auto build task that we are just going to create is triggered, this takes the files present in the path specified in the task and converts them into docker images and pushes it into the container registry.

Step 3:

Open a empty .sh file and edit it like below

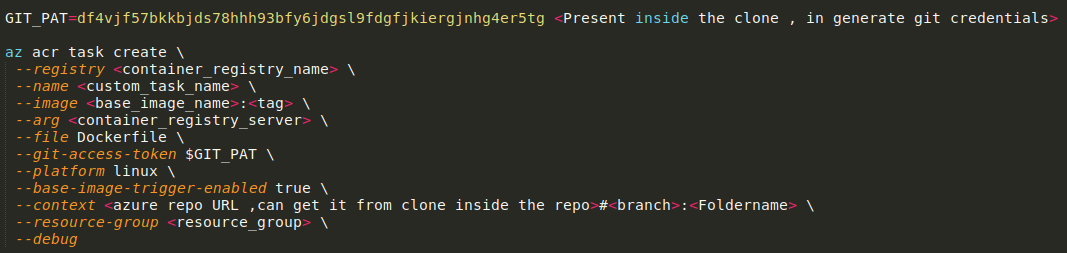
Note : To successfully create this task your Azure devops must have admin credentials.

Step 4:

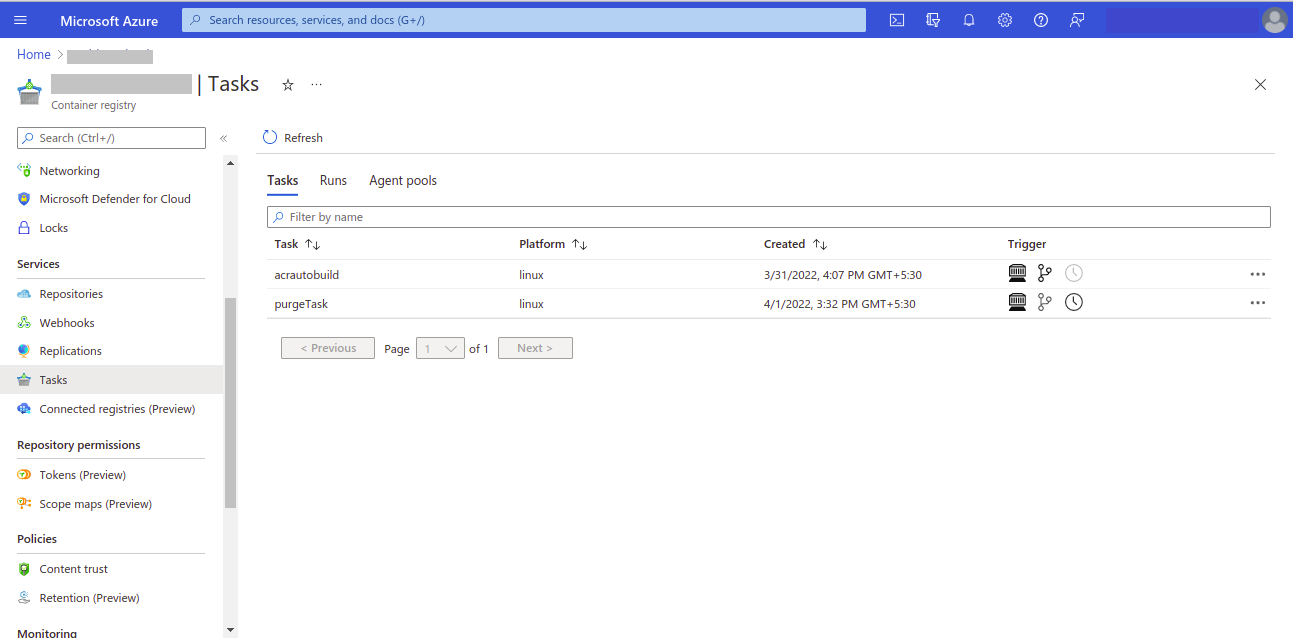
Run this .sh file from the command line from the path where you have the Dockerfile, if it runs withour errors, your task is created successfully. You can check the task in the task tab under services in the ACR.


Step 5:

Now push your function app from local folder to Azure devops repo.

Open command line and use the following commands to push.

  1. git clone <repo url> – Clone the Azure git repo
  2. The repo will be created in the local path, now copy your function app folder and paste it inside this repo.
  3. cd <cloned repo name>
  4. git status – to check the changes made.
  5. git add .
  6. git commit -m “new commit”
  7. git push

Step 6:

Now your function app is on the Azure Repository.

Step 7:

As soon as this is pushed, wait for few minutes, check your container registry’s repository, it will have this function app added with the tags.

Step 8:

Go to the function app and click the functions tab in the side bar which show the function app deployed.

Step 9:

 To Test if its running, select the http trigger file, and click on Get Function URL.

Step 10:

Either paste the URL in the browser and check if you get the same output as in the local machine or Post the url on postman to see if you get a 200 OK.

Step 11:

If yes, then our function app is successfully up and running in the cloud.

So, any push there after to that branch with any changes will trigger the task automatically and the function app will be updated. This might take to few minutes.

With this we have come to the end of how can we deploy function apps on azure. Hope this helped your requirement.

Thank you for reading.